Neuroinformatics Group


Universität Bielefeld › Technische Fakultät › NI
Search
CITEC SummerSchool 2011 - Module "Manual Action and Intelligence for Robots"
Based on findings of cognitive motor science, how humans represent grasping and more complex movement sequences, the goal of this modul is to introduce approaches to robotic realization of those concepts. To this end, we consider a grasping strategy based on grasp prototypes and tactile feedback to realize stable grasps and a hierarchical state machine approach to model sequences of basic action primitives.
Tactile-Based Grasping RoethlingHaschkeSteilRitter2007-PPA
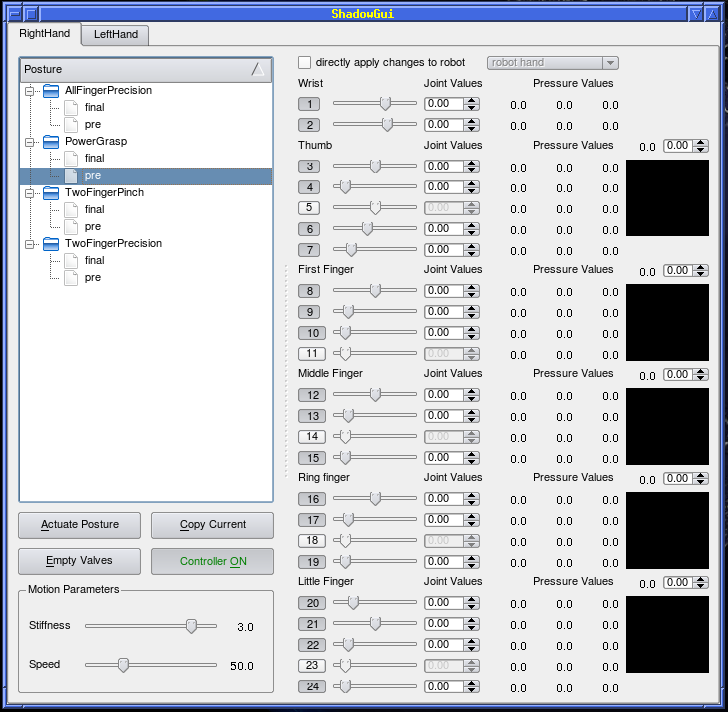
The prototype-based approach to grasping considers two hand postures for every grasp prototype: a pre-shape posture used while approaching the object, and a final grasp posture to actually realize the grasp. Starting from the pre-shape posture, which coarsely encloses the object, the finger joints are actuated towards the final grasp posture until object contact is detected using tactile feedback.
Using a physical simulation, find hand postures for the pre-shape and final grasp to realize a power grasp. To this end you will need the components of the "xcf" group (for interprocess communication) and "hands" group (see application management). Use the sliders of the HandGui to operate each finger joint individually.
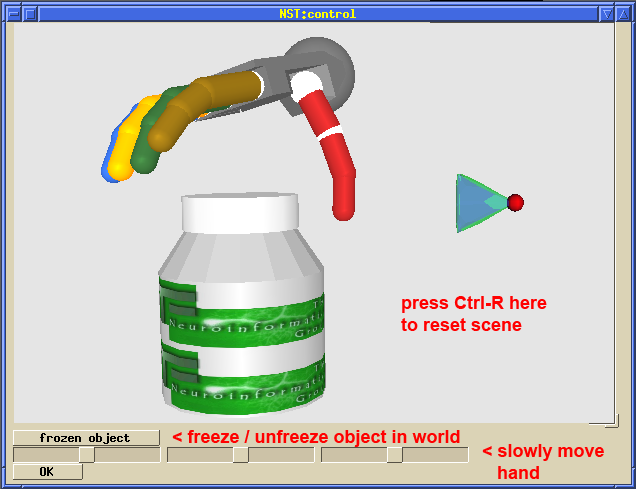
To circumvent premature pushing of the object, it is initially frozen in the world. To finally test your grasp, you should unfreeze the object pressing the button "frozen object" in the simulation window. You can also try lift the object operating the sliders in the simulation window to move the hand. To reset the initial state of the simulation, you can press "Ctrl-R" in the simulation view.
If you finally found a good grasp, you should save it in the HandGui and "synchronize to the DBXML memory". Use the context-menu of the posture list to do this.
To test, how your grasp generalizes to other large objects, you can edit the file "neo/scene.me" and uncomment another prepared object. Please save the file with a new name, because all participants share a common user account. You need to select your new scene file in the grasp simulation, pressing the "m" button of the "scene" unit and selecting the new file.
Organization of Robot Behaviour with Hierachical State Machines RitterHaschkeSteil2005-ADI
For the second task of the module you need the components of the group "behaviour". We prepared a simple state machine to realize grasping of objects at positions recognized by a vision system. To this end we replay previously recorded events, the real vision system sends when the object is stably recognized in the world. This is done by the "vision-simulator" component. Here you can choose different object locations and the sending rate. Trigger the vision events and observe the state transitions in the "HSM viewer" component.
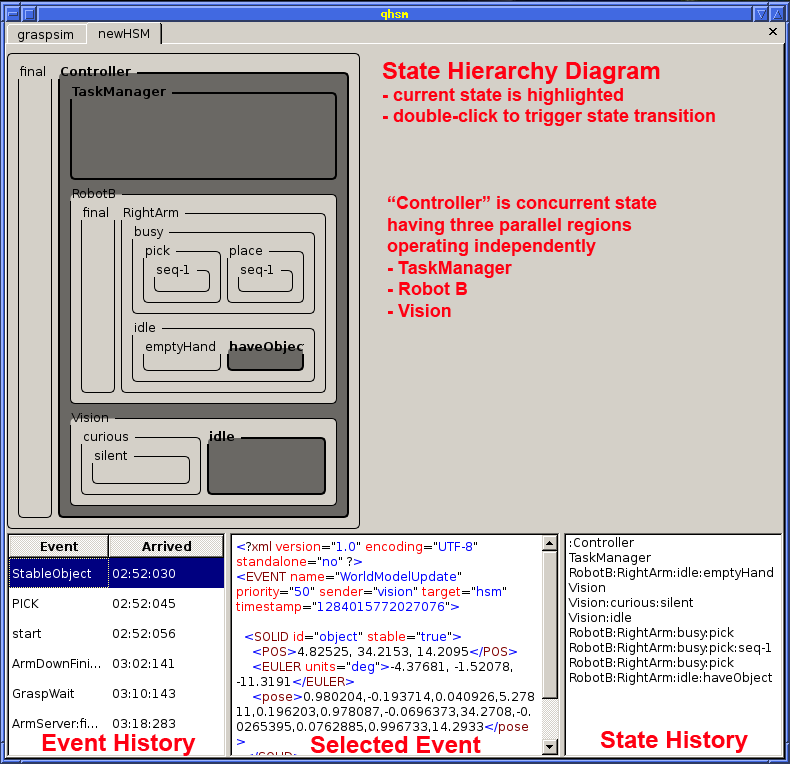
What happens, if you use the vision file "vision-front-left.xml"? Have a look into the armserver terminal! If you want to continue from this deadlock state, you need to manually change the state of the RightArm to "emptyHand", by double-clicking on the respective state in the HSM visualisation.
Have a look at the organization of the HSM description in XML format, starting the "hsm-edit" component. Find the <SAY> action in the control.hsm file and try to integrate speech at other useful places, e.g. to announce that a grasping command was accepted, has failed (and why), etc. Again save the modified files with a unique name. Additionally you need to set the following environment variable
export HSM_CONFIG="~/my-control-file.hsm"
and restart the startup script (vdemo2 grasping.sh)
Application Management
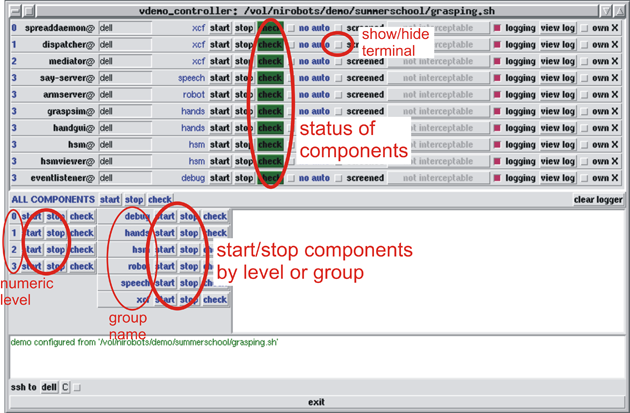
Robotic setups are composed from multiple components which are typically also distributed amongst several machines. In order to facilitate the component management and surveillance we use a small Tcl/Tk tool called vdemo. It can launch and stop the components from a GUI triggering appropriate shell commands through ssh on remote computers. The upper part of the vdemo GUI shows all components included in the setup and allows to start, stop and monitor them individually.
In the lower part of the GUI you can start components by level or group. While the level indicates a starting order (increasing with the level), the group name shall facilitate a semantic grouping of components. Typically you will need to start components by group or individually. Each component is run in a terminal window, which is typically hidden to circumvent cluttering the desktop with window. However, you can show the window by pressing the "screened" button and examine the components output. Another way to examine the components output is to press the "view log" button (if logging was enabled for this component). This method also works if the component failed for some reason and the screen session is not available anymore.
| Attachment | Size |
|---|---|
| Grasping Talk | 650.31 KB |